Anzac Memorial Step-by-Step Gallery
Introduction
This is a step-by-step illustration of how I rendered the Anzac Memorial
from my Sydney tileset in SCURK.
The very first step was to find some good architectural books in my local
library with photos and sketches of the monument. These are a
fantastic resource. Next I drew a rough sketch of the building on
paper and marked various measurements on the important lengths of
the building. You can do fairly well simply taking a ruler to a photo.
After scaling (I use roughly 1 pixel per metre, which gives tiles
about 4 times smaller than Maxis says they are, but to me it seems
much more like the right scale, going by the existing buildings) I
decided this would fit nicely into a 3x3 tile. Time to power up SCURK!
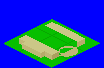
Step 1
The first thing I realised was that the colours I wanted to use to represent
the sandstone of this building were the same as those of the SCURK empty
tiles. To reduce confusion, I recoloured the tiles green, with the
inter-tile lines a darker green. Then in three basic sandstone colours
I laid out the basic ground level boundaries of the building and built
each up vertically a fixed distance. The flat surface of the lightest
colour was filled in for the first "level". The centre was left empty
at this stage, and the beginnings of the circular staircase were put
in place.

Step 2
By referring to my sketches, I realised the base level was a little short,
so I added another row of pixels in height. Then I outlined the central
block of the building and built its walls up to the right height.
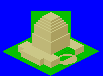
Step 3
This process was continued for each of the higher levels. As I went up,
the building began to encroach on the surrounding squares of blank
tiles, so I added more green to keep things clear. At this point the
overall structure of the building is clear and only details remain to
be added.
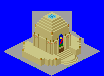
Step 4
This is the detailing stage. First I switched the green background to
a speckled grey to represent concrete footpaths. With the right
background colour, the sandstone looked a little light, so I switched
to darker shades for the left and right walls (I left the horizontal
surfaces very bright). Then I drew in the
steps, the doorway and the stained glass window and skylight.
I noticed a glitch in my sketches compared to a photo of the momument
and had to add an extra wall indentation at each corner of the base.
To represent the sandstone sculptures at the various corners I chose
darker stone colours and mixed in the odd orange pixel. The sculptures
are actually people, but it's hard to tell at this scale! The ring of
sculptures halfway up the main block sit on individual pillars
attached to the block, so these were added in appropriate shadings.
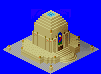
Step 5
With the basic building complete, I added the small sculptures at the very
corners of the tile. Then I exported the bitmap from SCURK and used
Paint Shop Pro to add shadowing on the right side of the building and
the ground. Re-importing the file into SCURK, I cleaned up a few odd
pixels in the shadowing, removed the extraneous background, and Voila!
Last updated:
